With so many options in the shopping world, 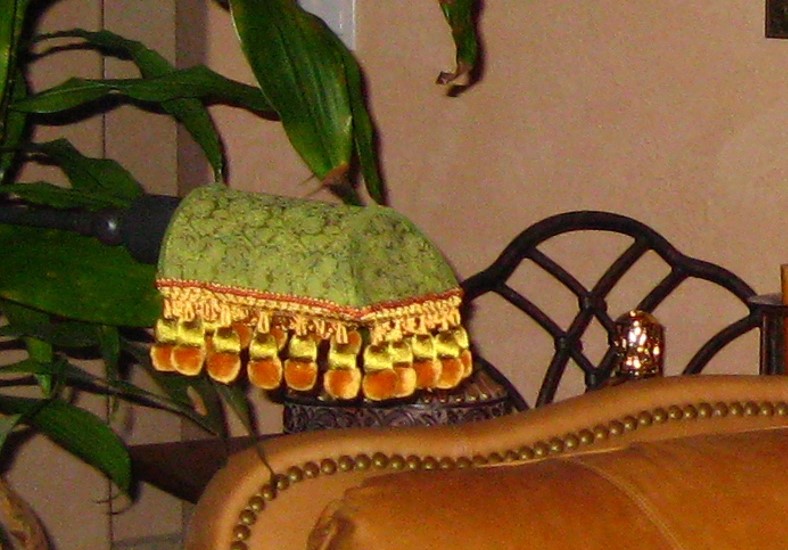 you’d think it would be easy to find exactly what you want. Well, I don’t know about you, but I don’t have an easy time of it! Either I can’t find what I want, or I can’t find it at a price I am willing to pay.
In either situation, I turn to the fabric or craft store, and my own creativity to create a piece that fits my needs. The lamp that is pictured here started as a typical, solid metal shade on an adjustable-arm floor lamp. It was exactly what I needed for a Design ReMix I was doing, but I wanted a more luxurious look.
If you’re interested in trying your hand at something similar, basic instructions and supply list are given below. Feel free to contact me with any questions, and have fun! You’ll be more pleased with the results of your own craft handiwork than you ever would be with a store-bought item.
A couple of warnings: be sure to take your time! Patience will lead to a better result, and poor workmanship will not make for an attractive addition to your interior spaces. Also, keep in mind that trims can be very expensive, so keep your overall budget in mind at all times. Find discount trim stores in your area and shop there first. Because this is a prime feature of this lamp, you want something special; it’s worth taking some time to find the right one!
How to Make This Custom Lamp Shade
Supplies
- Lamp of your choice. Be sure that not only the shape, but the type of bulb fits your needs before purchasing the lamp. Turn it on to be certain!
- Fabric enough to cover the lamp shade (plus a little extra for mistakes)
- Trim with tassels, etc. for bottom edge
- Yarn or other rope-like trim for seams
- Spray adhesive
- Hot glue gun (the real one, not the low-heat models)

- Ample supply of hot glue sticks
- Newspaper
- Scotch, masking, or any other type of tape
- Scissors
- Exacto Knife (Sharp!)
Instructions
-
This project should be done in a well-ventilated area because of the spray glue
-
Read all instructions before beginning. Once the glue is on, there is no going back! Know what comes next so you’ll be prepared
-
Allow approximately 2-4 hours for the completion of this project
-
Cut fabric pieces to roughly fit each section of the lamp
-
Cover all areas of the lamp other than the shade with either tape (small knobs, etc.) or newspaper and tape
-
Spray adhesive on individual sections of the shade, one at a time. Carefully position rough-cut fabric piece on adhesive section. Trim with Exacto knife to exact size.
-
Tip: Run the knife along the fabric with the flat of the blade against the adjoining section of the shade, as a guide. This will give you a clean cut line.
-
Repeat this spray adhesive step until all sections are covered and trimmed.
-
Heat hot glue gun
-
While gun is heating, measure and cut pieces of rope trim for seams, measuring along the actual lamp sections.
-
When ready, run a very thin bead of hot glue along the seam and attach pre-cut trim. End all pieces at a point where it will be covered by the bottom trim
-
Cover all seams in this way
-
Measure the bottom trim, add 1 inch
-
Tape off the end of the trim just above the desired measurement
-
The starting end should already be taped from the fabric store
-
If not, be sure it is taped before it begins to fray
-
Cut through tape at appropriate spot
-
This keeps the trim from fraying while you are gluing it
-
Start the trim under the arm, or another hidden spot where the end points will be as unnoticeable as possible
-
Dot hot glue at the starting point, and attach the end of the trim, after removing any tape carefully, so as not to fray unnecessarily
-
Carefully run a thin bead of hot glue along the edge and apply the trim
-
The hot glue will dry quickly, so do only a small section at a time
-
Continue until you reach the starting point
-
Remove the tape from the end, and cut off any frayed ends
-
Fold over the very end, as small as possible, to create a clean visible edge
-
Glue this fold to itself with a dot of hot glue, so the end will not need to be held until it’s glued down
-
Glue edge down until you reach the fold, and carefully glue that over the top of the starting -point to create a clean finish
-
-You are done! Plug in your lamp and enjoy the results!
